
by Daniel Righetti
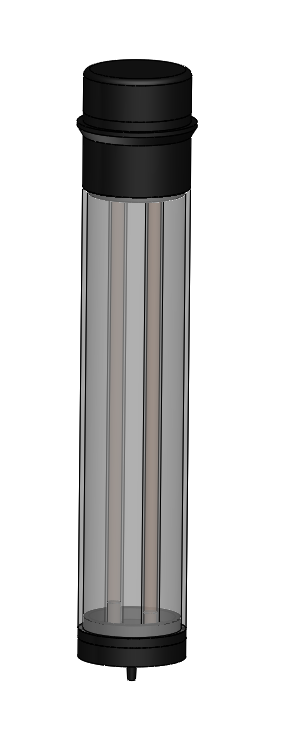
Figure 1 - The tube
Recently, a client came to us with a design which required a unique container to hold liquid. Naturally, it needed to be watertight, but the main challenge was in the materials – glass, acrylic and 3D printed components. Some quick context on how the container would function: liquid would be poured in from the top, flow through both glass tubes simultaneously and be stored in the base as it waited to be used. When it was completely full, the liquid would fill the glass tubes and half of the top compartment. The clear acrylic casing simply acted as structural support and protection for the glass, and didn’t come in contact with any liquid. The transparency of the materials allowed the user to know when the container was running low by looking at the liquid level in the glass tubes. The complexity of this project was focused on the unique aesthetics the client was trying to achieve.
We began with trial and error when designing with food-safe, PETG, 3D-printed parts – testing the hole sizes, spacing, depth and tolerances for the glass piece to fit comfortably and securely. After a few iterations, we began working towards creating a strong, watertight join between the glass and PETG.
We chose to apply a Super Clear Sealant to the joining areas that was transparent, food-safe, waterproof, and strong. It was used to fill the gaps in the holes and around, and block anything from escaping through the top (as indicated by yellow arrows in fig. 2).

Figure 2 - Plastic and glass connection point
Initial tests showed that the sealant helped to hold the glass tubes in place while we added the outer acrylic tube and provided a watertight seal. This same method was applied to a similar piece on the other end of the acrylic tube, creating an airtight seal in the area surrounding the glass.
Unfortunately, we were unable to test the liquid with the expected amount of pressure, as it was not completely assembled at this stage. This eventually led to leakages when the sealant was later tested – because it was silicone based, it didn’t form a strong bond with the glass or the plastic, and so it started to give way under pressure and flood around the glass (see fig. 3 – the dark blue area should not contain water).
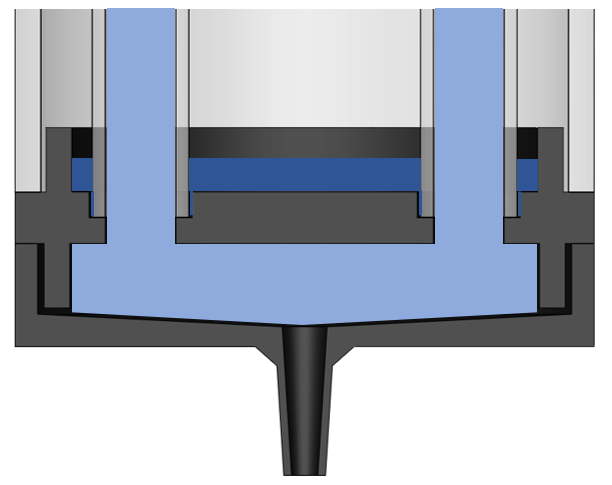
Figure 3 - Water flow and flooding
Another issue later discovered was that when the plastic components themselves were put under the same pressure and left overnight, the liquid would seep out through tiny, random holes in the 3D-printed body.
Our first solution was to insert additional 3D-printed parts around the connection point of the glass and plastic, which we sealed around the edges (see yellow indicators), to help stop the liquid from leaking out (see fig. 3). Although we knew this would slightly affect the flow rate, it wouldn’t make too much of an impact and would leave us with a decent, quick solution to our leaking problem.

Figure 4 - Sealant locations for new part
Although it was theoretically a good counter-measure, the additional parts were not 100% effective. After some planning and thought, we decided to drill holes in the acrylic tube that encased our parts (which also provided an air hole to avoid cracking under increased pressure during high-altitude flights) and used a thin tube and syringe to inject resin in to the area surrounding the glass (see fig. 5). We used an Easy Cast clear epoxy resin to get the job done, which took time to test when allowing for the resin to cure but ended up being extremely effective and aesthetically pleasing. To avoid the resin flowing into the plastic parts and clogging, we waited for 5-10 minutes after mixing the resin to allow it to set slightly. This level of viscosity allowed us to fill the desired area and any gaps from our previous attempts, without the worry of filling the plastic chamber below.

Figure 5 - Adding the resin
With this resin method, we can bypass our previous, less successful solutions and speed up the build process of each new container we make. Although the previous attempts were made redundant with the resin, exploring our options was necessary to fully understand the problem and the viability of various solutions. This kind of research and development has made us far more confident in our ability to make these custom containers water tight, and we now have a tested solution that we can implement in future projects should a relevant situation arise.